Custom tabs and menu actions are supported in both Novo and S-Release. Custom tabs appear on candidate, client, contact, job, and placement pages. The order of custom tabs matches the order specified in View Layout.
Custom menu actions appear on contextual menus for candidates, clients, contacts, jobs, and placements. The order of custom menu actions matches the order specified in View Layout. A line separator appears above the first custom menu action displayed. A maximum of five custom menu actions can appear on a menu. Custom menu actions appear in the following locations:
- Menu displayed when you select a candidate, contact, company, or job name from the candidate list, submission list, or placement list
- Menu displayed when you click Select An Action from a candidate, contact, company, or job record
Custom tabs and menu actions are all self-contained IFRAMEs hosted by the Bullhorn browser application. The IFRAME can request any URL that has been configured in Bullhorn. When the IFRAME is created, the Bullhorn application automatically appends the context data necessary for the remote server to identify the calling user and responds with the appropriate data or content for that Bullhorn record.
Example
The following example walks through how a fictitious company called Quick Assessments could create a custom tab that integrates Bullhorn with its service. Although this example uses a custom tab, you could easily implement the same functionality with a menu action.
Quick Assessments provides online assessments for common skill areas. Recruiters with an account can create a new assessment by providing the candidate’s key contact information and selecting the required assessment from a list of pre-configured options.
To simplify the process of registering candidates for assessments, Quick Assessments has created a custom tab on the Candidate record in Bullhorn. The application hosted in the tab provides a button that enables users to register a candidate for an assessment directly from the candidate record. It also presents a list of existing assessments for candidates who have already taken tests through the Quick Assessments application.
The following table describes how this custom tab interacts with the Bullhorn web application and the Bullhorn SOAP web services API to enable the integration.
| Action | Response |
|---|---|
| User loads the Quick Assessment tab of a Candidate record. | When the user requests the Bullhorn page, an IFRAME for the Quick Assessments application makes a request for the following URL: http://quickassessments.com/bhwidget/?Key=12349876&userid=0&entitytype=candidate&entityid=99&privatelabelid=105&height=yy&width=xx). The URL and the Key attribute were configured for this tab through the Bullhorn administrator based on instructions from Quick Assessments. Quick Assessments assigns each customer a unique Key for identification purposes. The remaining URL variables are appended at runtime by the Bullhorn application based on the user’s context. |
| The Quick Assessments page verifies that the Key matches a valid Quick Assessments customer ID and checks to see if there are any active assessments for a candidate with a userId of 99. If there are no assessments associated with this ID, the server returns HTML that displays an Add Assessment button. This appears within the tab in Bullhorn. | |
| User clicks the Add Assessment button. | Clicking the button loads a new HTML page within the IFRAME that presents a list of assessments that are available to this customer. |
| User picks an assessment and clicks submit. | Using the ID property for this candidate and its partner API key, the Quick Assessments application requests the necessary data from the Bullhorn SOAP web services API (name, email address, and so forth.). Using this data, the Quick Assessments application creates a new assessment and sends a notification to the candidate. It also stores the Bullhorn ID for future reference. |
| The Quick Assessment application refreshes the IFRAME and lists the current assessment with a status of “pending.” |
Creating a Custom Tab or Menu Action
The amount of space available on a dedicated tab or popup window depends on the user’s screen resolution and user interface configuration. You should design the page to easily adapt to multiple widths. To ensure that no vertical scroll bars appear, the custom tab and custom menu action features provide a way for your application to communicate its height to the hosting page. To take advantage of this feature, you should add a URL variable called displayHeight to the URL when it is configured in the View Layout tool. For example, http://[baseURL]?displayHeight=3000px. If you do not provide a displayHeight value, the default height of the IFRAME is 4000px. You can also dynamically modify the height of the IFRAME by changing the displayHeight variable after Bullhorn has initialized the IFRAME. This is useful if your page dynamically shows or hides regions of the DOM, or if users will navigate through multiple pages of different heights. The following JavaScript functions can be added to any page that appears in a custom tab:
function addResizeParameterToUrl()
{
var size = document.body.scrollHeight;
var currentHref = decodeURIComponent(getQueryStringParameter(location.href,
"currentBullhornUrl").replace(/\+/g, " "));
var fragment="displayHeight=" + size;
currentHref+="#" + fragment;
parent.location.href=currentHref;
}
The hosting Bullhorn page listens for changes to the displayHeight URL variable and adjusts the dimensions of the IFRAME accordingly. To ensure this variable is updated, you must also attach the addResizeParameterToURL() function as a listener to the onresize and onload events on the page. You can do this by adding the following to the page’s body tag:
<body onresize="addResizeParameterToUrl();" onload="addResizeParameterToUrl();">
Depending on the amount of DOM scripting in your pages, you may also need to call this function from other places in your application as well. If additional personalization or authorization is required, you can use the dynamically appended variables listed below or use a login screen and cookies to manage authentication. When the request is made, the following dynamic variables are appended to the component’s URL on a per request basis.
| Parameter Name | Type | Description |
|---|---|---|
| CorporationID | Integer | The unique ID for the corporation of the current user. |
| currentBullhornUrl | String | The URL of the Bullhorn page that is hosting the IFRAME. This value is URL encoded. |
| EntityID | Integer | The unique ID for this entity instance. This can be used to retrieve the entire entity DTO using the find operation. |
| EntityType | String | The name of the entity page on which this component has been placed. Possible values are Candidate, Client Contact, Client, and Job Posting. |
| PrivateLabelID | Integer | The unique ID for the private label (configuration) through which the user is accessing the application. |
| UserID | Integer | The unique ID for the user of the application. |
| authCode | String | An encoded value used by partner applications to authenticate the request (included only for tabs or menu actions configured for a partner application). |
The page that processes the request should use these values to authorize the request and determine what content should be returned to the user when the component is loaded. The method for accessing these variables varies depending on your programming environment. For example, in PHP, they become accessible in the $_REQUEST variable; in ASP.NET, they become accessible in the Page.Request object.
The following table describes how a custom tab or custom menu action interacts with the Bullhorn web application and the Bullhorn SOAP web services API to enable the integration.
| Action | Response |
|---|---|
| User clicks a custom tab or a custom menu item. | For a custom tab, the web page for the associated URL opens in an IFRAME that fills the tab. For a custom menu action, the web page for the associated URL opens in an IFRAME that fills a popup window. |
| For a custom tab, the user interacts with contents of tab. For a custom menu action, the user interacts with a popup window. |
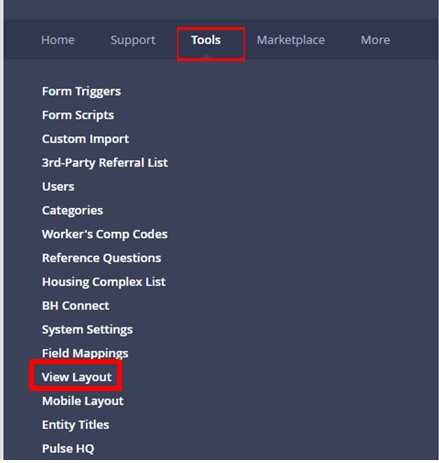
Configuring a Custom Tab or Menu Action
To configure a custom tab or menu action:
- On the Tools menu, select View Layout.
- Select the entity to which you want to add the custom tab or menu action.
- To add a custom tab, select the Custom Tabs tab.
- To add a custom menu action, select the Custom Menu Actions tab.
- Click the Add New button.
- In the Name field of the new entry, enter the name to display for the custom tab or menu item.
- In the URL field, enter the URL you want to request.
- In the Partner Name field, select a partner name if desired.
- If you are configuring more than one custom tab or menu action, use the arrows to set the order in which the items will appear.
- Click Save.
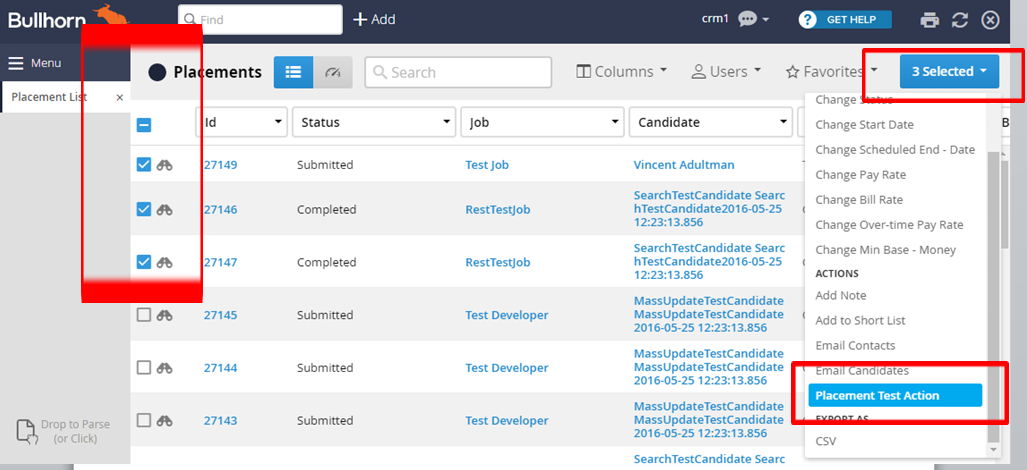
Creating a Custom List Action
Custom list actions let you extend the custom menu actions to an S-Release list, and can be enabled and executed for multiple records. Custom list actions are only available to S-Release users. When you select multiple items on a placement list and invoke a custom list action, only the ids for the selected items are sent to the endpoint specified in the custom list action configuration. Configuring Custom List Actions To access and configure custom list actions:
- Log in as an S-Release user with administrative privileges.
-
Select Menu > Tools > View Layout.
- From the Layout configuration page, select the entity for which you want to add a custom list action.
-
After the page displays, click the Custom Menu Actions tab.

From the Custom Menu Actions tab, you can add and edit custom actions. Location allows you to specify where you would like the Custom Action to appear within the Bullhorn application.
- “In a record, on the menu” is the existing functionality of custom menu actions.
- “On a record list, in the Update section” categorizes the custom list action under Update. To control which users have access to the custom list action, use the “…” in the Update section.
- “On a record list, in the Action section” categorizes the custom list action under Action.
- Select Enable & Save to immediately enable the Custom Action.
Note: To use custom list actions for placements, Bullhorn users must have the Edit Placement From List user entitlement.
Using Custom List Actions
Once a custom list action is created and enabled, users access it on an entity list page. A user selects one or more items in the lst and then under the Selected drop down, the user can execute the custom list action against the selected items. In the following example, the Placement Test custom list action is selected.
Note: The maximum number of items you can send via a custom list action is 500 items. If you have more than 500 items, you must send them in batches of 500 at a time.
The following result page displays when you execute the custom list action:

Note: The currentBullhornUrl is the URL called to produce this result. If you call this URL in a browser, depending on the number of entityIds included in the URL, the call might fail due to the browser URL length limit.