Note: Custom components and external controls are not supported in Novo. In Novo use custom overview cards instead of custom components and field interactions instead of external controls.
Custom components are tied to field maps and you configure them with the Field Mappings tool. Custom components appear on entity pages. While custom components can be interactive, they do not by default modify Bullhorn data. External controls are used on edit forms.
Custom display components can only appear on overview pages and have a limited amount of space, but they have the advantage of being immediately visible to the user when the record is opened. You should decide whether a custom display componen makes sense based on the data it must present and how the user will interact with it. Bullhorn partners creating components for multiple customers should also provide instructions that specify where administrators can or should place their component for it to render properly.
Custom components are self-contained IFRAMEs hosted by the Bullhorn browser application. The IFRAME can request any URL that has been configured in Bullhorn. When the IFRAME is created, the Bullhorn application automatically appends the context data necessary for the remote server to identify the calling user and responds with the appropriate data or content for that Bullhorn record.
All requests to the remote system are made from the user’s client computer, so the remote application can reside on any system to which the user can gain access. The custom component can be as simple as some customized content relevant to the current record, or it can involve multiple user interactions and component refreshes.
Creating a custom display component (not supported in Novo)
Custom display components are dedicated portions of a screen in Bullhorn that are programmed to show non-Bullhorn content that is served from a remote application or service. Building a custom display component is as simple as creating a web application that can process requests from the IFRAME component and render an HTML user interface that fits into the space allotted by the Bullhorn user interface.
When a custom component is initialized in the Bullhorn application, it issues a GET request for its associated URL. The URL is configured in the Default Value property of the Custom Component field. These values must be configured by the Bullhorn administrator using the Field Mappings tool. The URL can also include any variables needed to authorize this account with the external application; for example, username, password, account number, and so forth. Each customer or private label can have a unique URL/variable combination, but all requests made from that private label contain the values configured for the custom component.
If additional personalization or authorization is required, you can use the dynamically appended variables listed below or use a login screen and cookies to manage authentication. When the request is made, the following dynamic variables are appended to the component’s URL on a per request basis.
| Parameter Name | Type | Description |
|---|---|---|
| CorporationID | Integer | The unique ID for the corporation of the current user. |
| currentBullhornUrl | String | The URL of the Bullhorn page that is hosting the IFRAME. This value is URL encoded. |
| EntityID | Integer | The unique ID for this entity instance. This can be used to retrieve the entire entity DTO using the find operation. |
| EntityType | String | The name of the entity page on which this component has been placed. Possible values are Candidate, Client Contact, Client, and Job Posting. |
| PrivateLabelID | Integer | The unique ID for the private label (configuration) through which the user is accessing the application. |
| UserID | Integer | The unique ID for the user of the application. |
The page that processes the request made by the custom component should use these values to authorize the request and determine what content should be returned to the user when the component is loaded. The method for accessing these variables varies depending on your programming environment. For example, in PHP, they become accessible in the $_REQUEST variable; in ASP.NET, they become accessible in the Page.Request object.
Configuring a custom display component
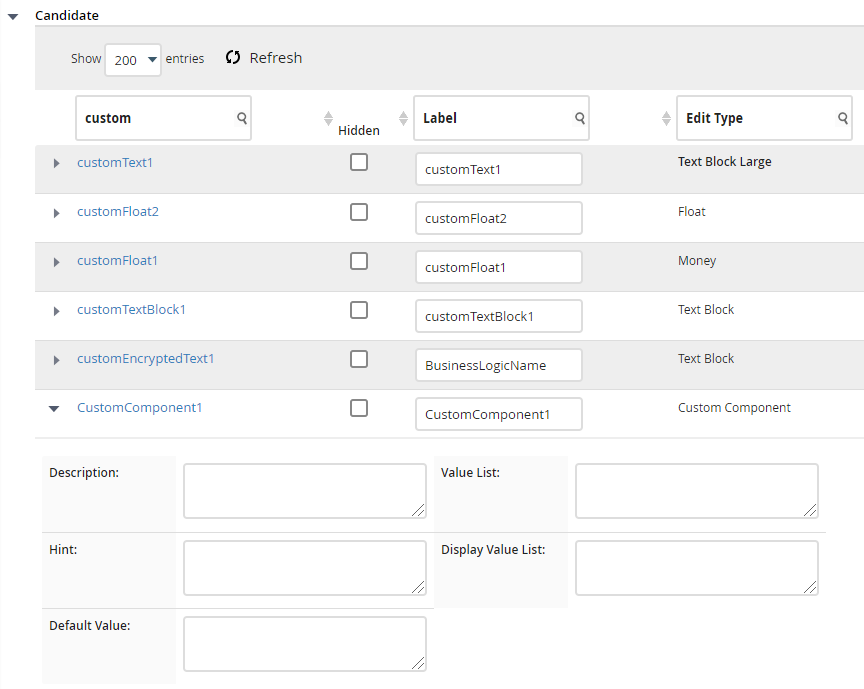
Configuring a custom display component for use in the Bullhorn application involves the View Layout and the Field Mappings tools. Each of the supported records in Bullhorn includes three fields that can be used for custom components: CustomComponent1, CustomComponent2, and CustomComponent3. To configure the URL for a custom component:
- Open the Bullhorn Field Mappings page.
- Select the entity type to which you would like to add the component.
- Click the name of one of the available custom component fields (CustomComponent1-3).
- In the Hidden field, change the value to No if it is not already set to No.
- In the Default Value field, add the URL that should be requested for this component.
- Click Save.
Once your custom display component has been configured in the Field Mappings tool, it is ready to be placed on either the Overview tab of that record type (the default view) or on a custom tab on that record type.
Placing custom display components on the Overview tab
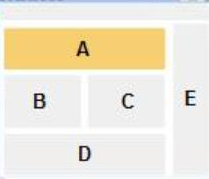
There are five potential locations for a custom component on the Overview tab. The following table and figure illustrate the available placements and the corresponding sizes for custom components. The size values will be included as URL variables (see above).
| Placement | Height | Width |
|---|---|---|
| OverviewTop (A) | 150 px | 600 px |
| OverviewLeft (B) | 150 px | 300 px |
| OverviewRight (C) | 150 px | 300 px |
| OverviewBottom (D) | 150 px | 600 px |
| SideInfo (E) | 150 px | 150 px |
To configure the placement of the custom component on the Overview tab of the entity page:
- Open the Bullhorn View Layout page.
- Select the entity type on which the custom component should appear.
- Select the Overview Tab tab.
- Locate the section where you would like to include the component
- Select the component from the list of fields in the Exclude from View list.
- Click the right arrow to move this field to the Include in View list.
- Click Save.
The custom component now appears on the Overview tab of the entity.
Creating an external control (not supported in Novo)
Custom edit controls allow you to override the built-in edit controls in Bullhorn and replace them with controls that present data not managed by the Bullhorn application. When the user saves the form, Bullhorn takes the value set by the custom edit component and inserts it into the appropriate field in the Bullhorn record.
Like custom display components, custom edit components are displayed within an IFRAME. The URL requested by the control includes all of the parameters listed above for custom display components. In addition, the current value for the edit control’s field will also be included in the URL, as follows:
| Parameter Name | Type | Description |
|---|---|---|
| baseControlName | String | The name of the field with which this custom edit component is associated. This corresponds to the field in Bullhorn that will be updated when the form is saved. |
| value | Any | The current value of the field in Bullhorn. |
Once they have been loaded, custom edit components communicate with the Bullhorn application form by changing the parent href property (the href of the form that launched the custom external control).
The following example illustrates the HTML and JavaScript for a drop-down control that is configured for the experience property.
<html>
<head><title></title></head>
<body onload="initialize()">
<script type="text/javascript">
function initialize(){
// Get the name of the control and its current value from the href property
var controlName=getQueryStringParameter(location.href, "baseControlName");
var initialValue=getQueryStringParameter(location.href, "value");
//Set the experience drop-down to the current value
var dropdown = document.getElementById("experience");
for(i=0;i<dropdown.options.length;i++){
if(dropdown.options[i].value==initialValue){
dropdown.options[i].selected =true;
return;
}
}
}
function setValue(value) {
//Get control Name (passed in url src)
var controlName=getQueryStringParameter(location.href, "baseControlName");
//Get current url from currentBullhornUrl param
var currentHref=decodeURIComponent(getQueryStringParameter(location.href, "currentBullhornUrl").replace(/\+/g,  " "));
//Build controlName and value in the format controlName=value
var fragment=controlName + "=" + value;
currentHref+="#" + fragment;
parent.location.href=currentHref;
}
//Generic function to extract values from the referring URL
function getQueryStringParameter(href, paramName){
var regexS = "[\\?&]"+ paramName +"=([^&#]*)";
var regex = new RegExp( regexS );
var results = regex.exec( href);
if( results == null ) {
return "";
} else {
return results[1];
}
}
</script>
<select id="experience" onchange="setValue(experience.options[selectedIndex].value)">
<option selected>Please select one...</option>
<option value="beginner">Beginner</option>
<option value="intermediate">Intermediate</option>
<option value="advanced">Advanced</option>
<option value="expert">Expert</option>
</select>
</body>
</html>
Configuring an external control
Configuring a custom external control for use in the Bullhorn application involves the Field Mappings tool. To configure one of the Bullhorn fields to use a custom edit component:
- Open the Field Mappings page.
- Select the entity to which you would like to add the edit component.
- Click the name of the field whose edit control you want to replace (for example, experience). Note: You cannot use any of the customComponent1-3 fields, as these do not represent record values that are stored in Bullhorn. You must use a standard Bullhorn field, such as experience or customText1.
- Select Custom External Control from the Edit Type drop-down.
- In the Default Value field, add the URL that should be requested for this component.
- Click Save.
Configuring the client browser for external controls
To function properly, the website where the control(s) are hosted must be added to Internet Explorer Trusted Sites and the Navigate sub-frames across different domains custom setting must be enabled for the trusted sites.